toggle switch wiring diagram
This is a free printable toggle switch wiring diagram: download the diagram as SVG or open it and print to paper or PDF.
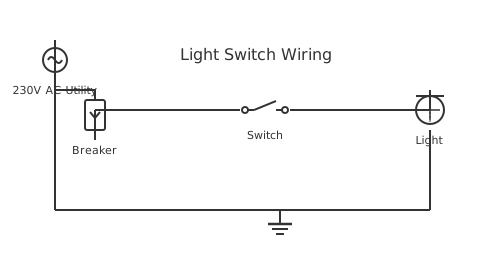
A toggle switch wiring diagram diagram provides essential guidance for proper installation, connection, and troubleshooting of this critical automotive electrical component. Understanding the correct wiring configuration ensures safe, reliable operation while protecting equipment from damage. This diagram shows all required connections, terminal designations, wire gauges, and grounding requirements for successful implementation. Proper installation following manufacturer specifications and local electrical codes is essential for both safety and performance. The system incorporates multiple safety features and protection devices that must be correctly wired to function properly. Common installation mistakes include incorrect polarity, inadequate grounding, undersized wire gauge, and missing overcurrent protection. Always disconnect the negative battery terminal before working on automotive circuits to prevent short circuits and electrical hazards. Regular maintenance and periodic inspection ensure continued reliable operation. Whether upgrading existing systems or installing new equipment, this diagram serves as the authoritative reference for correct wiring practices.
How to wire toggle switch wiring diagram
- Review the diagram thoroughly and gather all required materials, tools, and safety equipment
- Turn off all power sources and verify they are de-energized using appropriate test equipment
- Mount all components according to the diagram, ensuring proper spacing and environmental protection
- Make all connections following the diagram precisely, using appropriate wire gauges and terminal types
- Test the complete installation before applying power, verifying all connections are secure and proper operation
Frequently asked questions
What is the first step before starting this installation?
Always review the manufacturer documentation and applicable electrical codes. Turn off all power sources. Use a multimeter to verify power is truly off before beginning work. Gather all required materials, tools, and safety equipment.
How do I know if I've wired this correctly?
Check continuity between conductors with a multimeter. Verify polarity matches the diagram. Look for proper connections at all terminals. Test with power applied and confirm expected operation. Use a clamp meter to verify load current is within specifications.
What size wire should I use?
Wire size depends on the current to be carried and distance from source. Undersized wire causes overheating and fire risk. Oversized wire adds unnecessary cost. Consult the diagram and follow manufacturer recommendations. When in doubt, use the next larger size.
Why is grounding so important?
Grounding provides a safety path for fault currents, preventing dangerous voltage on equipment frames and conductors. Without proper grounding, accidental contact with energized equipment can cause serious injury or death. Ground connections must be continuous from source to equipment.
Should I hire a professional?
Complex installations, code compliance questions, high-voltage work, or installations affecting public safety require qualified electrician consultation. Local codes may mandate professional installation for certain applications. When in doubt, professional help is worth the investment for safety assurance.
Related diagrams
- toggle switch wiring 3 pin
- 1 gang 1 way switch wiring diagram
- 1 gang 2 way switch wiring diagram
- 1 switch 1 socket connection diagram
- 1 switch 2 socket connection diagram
- 1 switch 3 socket connection diagram